Comparison of residual stresses determined using different methods
J. Čapek1, K. Trojan1, J. Němeček1, N. Ganev1
1Department of Solid State Engineering, Faculty of Nuclear Sciences and Physical Engineering, Czech Technical University in Prague
jiri.capek@fjfi.cvut.cz
The majority of hitherto practically used diffraction measurements methods and algorithms for residual stresses calculation assume case of isotropic (non-textured) polycrystalline material. Due to the comparatively frequent existence of preferred orientation (texture), not only in metals, it is more than desirable to have at disposal a method, procedure and even a computation algorithm for proper and correct residual stresses determination. For this purpose, a new method was used for determination of residual stresses without neglecting the texture.
For
determination of residual stresses, three methods were used: standard sin2ψ
method, method of harmonic function [1] and new method based on a model by
Dölle [2, 3]. Contrary to Dölle method, the new method determines anisotropic
elastic constants as a weighted average between single-crystal and
X-ray elastic constants with weighting being done according to the relative
intensities in the measured directions.
The tested
samples of plate shape were made of AISI 420 (ferritic), AISI 304 (austenitic)
and AISI 318LN (duplex) type of stainless steel. The samples were cold-rolled to
1.5 mm in thickness with 0, 10, 20, 30, 40, and 50% reduction of thickness. At
the end, the samples were annealed in air laboratory furnace in order to reduce
residual stresses. Analysed stresses were compared with theoretical values of external
stresses generated by four-point bending. Presented stresses σ are
superposition of external stresses σN and residual
stresses after annealing (σnon-bended). Values of σ’N
represent theoretical value of stresses with respect to
σnon-bended. In ideal case, the values of σ should
be equal to σ’N.
The CoKα radiation and X'Pert PRO MPD diffractometer were used to sample analysis. Texture analysis was performed on the basis of the orientation distribution function (ODF) calculated from experimental pole figures which were obtained from three diffraction lines {110}/{220}, {200}, {211} of ferrite phase and {111}/{311}, {200}, {220} of austenite phase using MTEX software [4]. For determination of harmonic coefficients, which are necessary to know for method of harmonic function, the ResMat software was used.
X'Pert PRO MPD diffractometer with manganese and chromium radiation was used to measure lattice deformations in austenite and ferrite phase, respectively. Diffraction angles 2θhkl were determined from the peaks of the diffraction lines Kα1 of planes {311} of austenite and {211} of ferrite phase. Diffraction lines Kα1 were fitted by Pearson VII function and Rachinger’s method was used for separation of the diffraction lines Kα1 and Kα2.
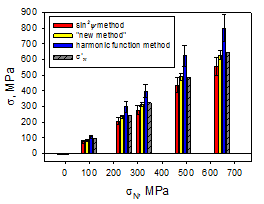
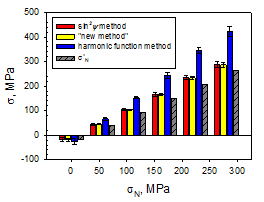
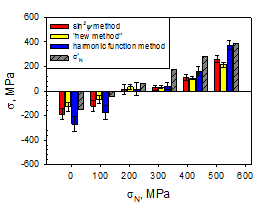
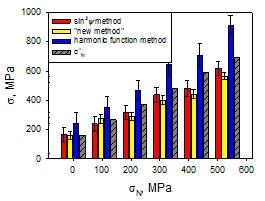
The applicability of the new method of residual stress determination in textured materials was proofed for single-phase materials and for major phases of multi-phase materials to approx. 50% yield strength, see Figs. 1. However, compared with the standard sin2ψ and harmonic function methods, much more accurate results were achieved. The main reason is presence of very sharp and strong texture, especially in duplex steel. Other reasons are different methods of calculation residual stresses and mainly accuracy of texture calculation.
|
|
|
|
a) Ferritc steel |
b) Austenitic steel |
|
|
|
|
c) Ferrite phase of duplex steel |
d) Austenite phase of duplex steel |
|
Figure 1. Determined stresses σ depending on external stress σ’N of samples with 50% reduction of thickness. |
|
1. H. J. Bunge, Texture Analysis in Materials Science. London: Butterworth. 1982.
2. H. Dölle, J. Appl. Cryst., 12, (1979), 489-501.
3. J. Capek, Z. Pala, O. Kovarik, IOP Conference Series: Mater. Sci. Eng.. 82.1, (2015), 012112.
4. F. Bachmann, R. Hielscher, H. Schaeben, Solid State Phenomen., 60, (2010), 63-68.
This work was supported by the Czech Science Foundation, grant No. 14-36566G.


