Real Structure and Residual Stresses in Advanced Welds Determined by X-ray and Neutron Diffraction Analysis
K. Trojan1, J. Čapek1, Ch. Hervoches2, N. Ganev1, P. Mikula2, K. Kolařík1
1CTU in Prague, Department of Solid State Engineering, Faculty of Nuclear Sciences and Physical Engineering, Trojanova 13, 120 00 Prague 2, Czech Republic
2Nuclear Physics Institute, ASCR, v.v.i., Department of Neutron Physics, 25068 Řež, Czech Republic
Karel.Trojan@fjfi.cvut.cz
Laser processing is nowadays widely used in modern industry, mainly because of its high productivity and precision. Developed laser welding methods using high power lasers took over the capability to fill groove with cold or hot wire metal from arc welding. This leads to change in mechanical properties of welds, especially reducing their hardness due to the quenching [1]. Therefore, the paper outlines using X-ray and neutron diffraction the capability of the advanced laser welding for joining thick sheets of structural steel in comparison with arc welding specifically metal active gas (MAG) welding. Profitable changes of real crystallographic structure and residual stresses (RS) in comparison with conventional laser welds improve the results during impact and tensile test and mainly enhance fatigue life. This has been shown in the article [2]. This paper describes the effects of welding on the RS and the real crystallographic structure (phase composition, crystallite size, microstrain) on cross-section of welds. Furthermore, the results of neutron diffraction verify previous assumptions of RS redistribution as a result of the surface preparation for determination measured lines by X-ray diffraction in two directions on the cross-section of the welds.
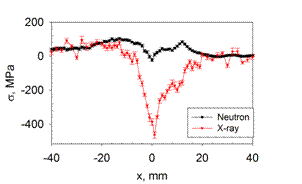
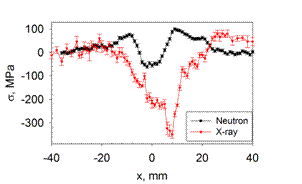
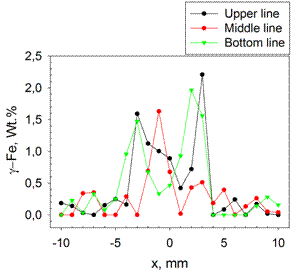
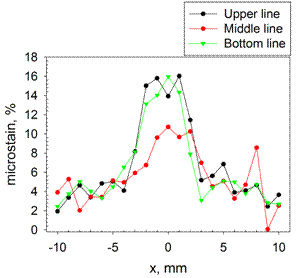
The analysed butt-welds were prepared by a double sided laser welding with cold wire and multilayer double side MAG welding from two 300×150×20 mm3 sheets made of S355J2 steel. The measurements were performed in three lines perpendicular to the welds. One line passes through the centre of the weld and the other two are located three millimetres below each surface. The example of comparison of RS for upper line obtained by neutron and X-ray diffraction in direction perpendicular to the weld is plotted for both samples in Fig. 1. In addition, phase analyses were measured on the cross sections, where the weight representation of retained austenite (see Fig. 2), crystallite size and microstrain (see Fig. 3) were evaluated by Rietveld analysis. In the graphs, the centre of the welds is given by zero on the x-axis.


Figure 1. Comparison of RS obtained by X-ray and neutron diffraction in direction perpendicular to the weld for laser (left) a MAG sample (right).
|
|
|
Figure 2. Weight percentage of retained austenite for laser weld. |
Figure 3. Microstrain for laser weld. |
The resulting RS gradients obtained using both methods with a different approach are in clear correlation. The redistribution of RS during the cutting has not yet been accurately described, but it can be deduced from these presented results that the preparation of the cross-section for X-ray diffraction measurements of the welds did not significantly change the distribution of residual stresses in the cutting plane. They were only partially affected. The dependency of retained austenite for the laser weld copies the boundary between the melt pool and the HAZ where the cooling was the fastest. On the contrary, the microstrain reaches the highest values in the middle of the original melt pool.
From our point of view, X-ray diffraction is a suitable instrument to describe the real structure and residual stress state even for the cross-section of such thick plates. However, it is necessary to keep in mind that even the residual stresses in the plane of the cut are partially affected by preparing the cross-section. It is often assumed that the residual stresses in this plane are not affected, but it is not always the correct assumption even according to these results.
1. M. Sokolov, A. Salminen, M. Kuznetsov, I. Tsibulskiy, Materials & Design, 32, (2011), pp. 5127-5131.
2. I. Černý, & J. Sís, Key Engineering Materials, 713, (2016), pp 82-85.
Measurements were carried out at the CANAM infrastructure of the NPI ASCR Řež supported through MŠMT project No. LM2011019 and Czech Science Foundation GAČR through the project No. 14-36566G entitled as Multidisciplinary Research Centre for Advanced Materials. The authors thank to Doc. Němeček for supplying the laser weld. This work was supported by the Student Grant Competition CTU in Prague grant No. SGS16/245/OHK4/3T/14.

