Neutron powder diffraction in Nuclear physics institute of ASCR
Přemysl Beran
Nuclear Physics Institute of ASCR and Research Centre Řež, Ltd., 25068 Řež, Czech Republic
pberan@ujf.cas.cz
Research team of the Nuclear physics institute has long time experience with the neutron diffraction. The diffraction instruments used up to now were dedicated for studying mainly the strains and stresses in the bulk materials but classical powder diffraction was missing. This free space was filled by the new powder diffractometer that was build and made operational in the second half of 2008.
Nuclear physics institute acquired multidetector bank from the recently closed research reactor in Studtsvik in Sweden. Around this multidetector as a base part new instrument was build that would like to open the neutron powder diffraction technique to large number of new researchers and teams that want to discover advantages of neutron powder diffraction or researches using international neutrons facilities to make first reasonable experiments near home laboratory with easier access.
This new instrument is called MEREDIT (Medium resolution diffractometer) and it is incorporated in to the international NMI3 (Integrated Infrastructure Initiative for Neutron Scattering and Muon Spectroscopy) project. Within this project collaboration and experience exchange with other laboratories and institutions is possible.

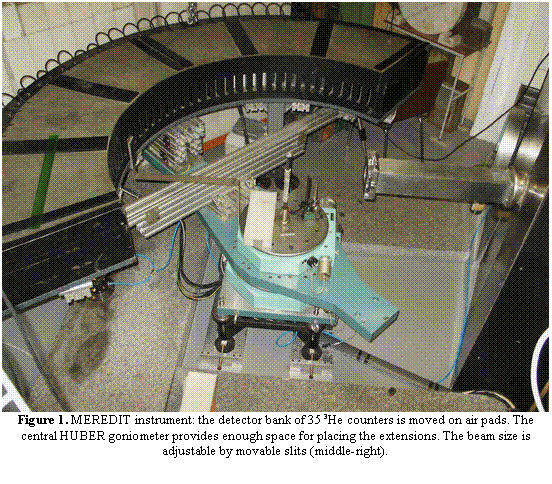
The MEREDIT instrument is placed at the horizontal channel
number 6 in the reactor hall of LWR15 (Light water reactor) in Řež. The default reactor operational power is 10MW and its
operation/standby schedule is 3/1 week. The diffractometer
consists of two large HUBER goniometer circles. The smaller
one provides enough space for placing the different sample environments such as
a cryostat, furnace, Euler goniometer, deformation
rig, etc. The detector bank is mounted in a moulded
neutron shielding made from boron carbide powder in epoxy resin. The bank
consists of 35 3He counters with corresponding 10' Soller collimators. They are all individually adjustable
and set at angular intervals of 4.00 degrees. The detector bank moves on air
pads, which provides together with the stepping motor positioning accuracy down
to 0.01 degree in 2q. Diffraction pattern can be collected in the angular range from 2
to 148 degrees in 2q.
Three different wavelengths can be selected using two different automatically exchangeable monochromators. The details about the monochromators and corresponding secondary beam parameters are given in the Table 1.
Table 1. Monochromators and secondary beam details
|
Monochromator |
Reflexion |
Wavelength (Å) |
Minimum Dd/d (x10-3) |
Neutron flux (n.cm-2.s-1) |
Beam size |
|
|
3 bent Si monocrystals |
(422) |
1.271 |
3.9 (at 56° 2q) |
~8.8x10⁵ |
2x4 mm2 |
|
|
(311) |
1.877 |
4.4 (at 59° 2q) |
~8.6x10⁵ |
2x4 mm2 |
||
|
3 mosaic Cu crystals |
(220) |
1.460 |
4.9 (at 71° 2q) |
~3.6x10⁶ |
4x4 mm2 |
All movable parts are driven by stepping motors and controlled by PC. The data from 35 counters are collected using two 24-channel Tedia cards. All communication and data collection is made with help of the special software ReMeSys (Regulation and Measurement System). This software is under continuous development to provide the best interface for out diffraction instruments and can easily adopt new extensions and experimental needs. The experiment flow is controlled by scripts written in Pascal like language what provide high flexibility needed for automation of complex experiments.

There are several sample environments to enhance the
measurement ability of the instrument: vacuum furnace able to cover the
measurement from the room temperature up to ~1000°C; close cycle cryostat
operating from room temperature down to ~10K. For textured samples, it is also
possibility to mount up the Euler goniometer. A
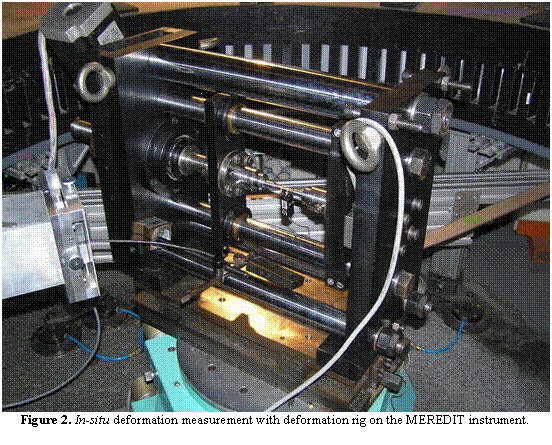
special deformation rig permits in-situ
measurements under uniaxial stress/pressure or
fatigue cycles (see Figure 2.).
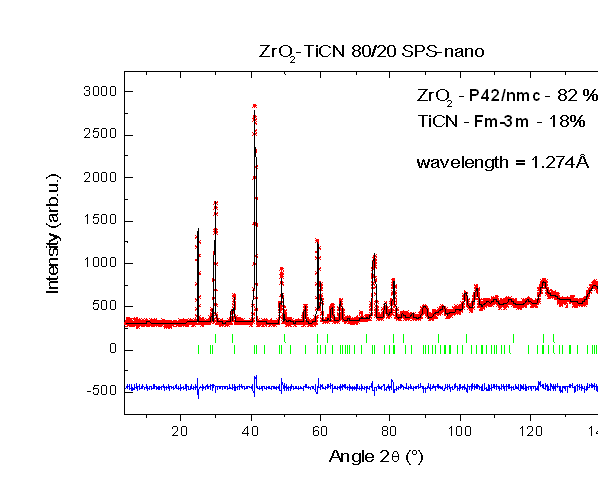
Collaborations with external researchers were established and the first interesting results of diffraction studies of inter-phase strain in the ZrO2/TiCN ceramics (Catholic University of Leuven, Belgium, see Figure 3.) or hydrogen storage materials ScAl0.8Mg0.2 (University of Uppsala, Sweden) are ready to be published. By using the deformation rig we studied in collaboration with the Institute of Physic of Materials of ASCR the deformation of TRIP or chromium-aluminium steels. Occasionally the instruments is also used as a testing facility for orientation the single crystals used for development of the new monochromators.

In collaboration with the Faculty of Mathematics and Physics
of the Charles University we plane to use this
neutron powder diffractometer for study of the
magnetic structure of intermetallic compounds.
The MEREDIT instrument has the power to be universal neutron powder diffractometer which provide easy access to the advantages of neutron diffraction technique and the researchers are welcome to try and taste the neutron science in practice.
Acknowledgement
Author would like to thank for financial support from Research Centre Rez (MSM2672244501).