X-ray diffraction study of distribution of macroscopic residual stresses in surface layers of steels after grinding
Z. Pala1, N. Ganev1, J. Jersák2
1Department of Solid State Engineering, Faculty of Nuclear Sciences and Physical Engineering, Czech Technical University in Prague, Trojanova 13, 120 00 Prague 2
2Department of Machining and Assembly, Faculty of Mechanical Engineering,
Technical University in Liberec, Hálkova 6, 461 17 Liberec 1
zdenekpala@seznam.cz
Keywords: residual stress distribution, grinding, electrochemical polishing, X-ray diffraction analysis
Abstract
The focus of this contribution is analysis of the state of residual stress in surface layers of ground bearing steel (ČSN41 4220) and stainless steel (ČSN41 7135). The influence of various coolants on macroscopic residual stress was investigated. Three forms of cooling were applied: dry grinding, liquid coolant and flow of cold air from a Ranque-Hilsch vortex tube. The surfaces of the samples were analysed by X-ray diffraction technique in six azimuths in order to acquire complete strain tensors. Since 2q211-vs.-sin2y dependences in grinding direction are non-linear and exhibit psi splitting, the method proposed by Dölle and Hauk [1] was used to evaluate tensors of anisotropic triaxial state of residual stress.
The effective penetration depth of CrKα X-ray radiation into ferrous materials for sin2y = 0,4 is approximately 4 mm and therefore removal of surface layers is a necessity in order to pinpoint the distribution of residual stresses beneath the surface. The impact of material removal should cause minimal or neglecting mechanical and thermal distortions to the investigated state of stress. Electro-chemical polishing, which was used, is acknowledged as the most appropriate tool [2].
Introduction
Grinding is counted to the finishing machining operation when the workpiece is gaining its final shape and surface. The appropriate choice of the parameters of grinding, material of abrasives of grinding wheel and form of cooling has relevant impact on the final quality. In order to obtain the proper conditions, it is necessary to carry out measurements of structural parameters of the surface.
It is widely accepted that the state of residual stress on the surface and in the near-surface area belong among the most important parameters of surface quality. Macroscopic residual stress may significantly affect fatigue limit, wear life and it could even increase the resistance to corrosion. There exist various methods for determination of residual stresses in materials, yet from the non-destructive methods, X-ray diffraction plays a prominent role because of its availability and accuracy. In combination with electro-chemical polishing, stress gradients from the surface can be established and studied. The use of electro-chemical polishing can be evaded only if synchrotron radiation, which enables the variation of wavelength and hence its penetration into material, is at disposal.
The aim of this study is a comparison of three manners of cooling during grinding from the point of view of macroscopic residual stress. Elaborated X-ray diffraction measurements were performed in order to obtain stress tensors for surfaces and for near-surface area of the ground samples. In order to verify the suitability of sin2y method, its conditions were checked.
Samples under investigation
The evaluation of surface and gradient of residual stresses states was studied for bearing steel CSN 41 4220, which is used for shaft manufacturing and therefore often ground, and for stainless steel CSN 41 7135.
Squared samples of dimensions 50 mm were 5.5 mm thick. All samples were first annealed in argon atmosphere for 2 hours at 550 °C; decline of temperature after annealing was done gradually in order to rule out any additional thermal stresses.
The process of surface grinding was conducted on a face grinding machine BPH 320 A. The number of used grinding wheel designating its characteristics was 1 - 250×32×76 - A98 60 K 9 V01-50 m.s-1; numbers 250×32×76 depict the dimensions and A stands for aluminum oxide (corundum), the material of the wheel’s abrasive. The samples were fixed on magnetic table, which was translating in respect to the center of grinding wheel and hence enabling the alternating processes of down-cut and up-cut grinding. Grinding conditions were as follows: the wheel speed was 35 m/s, tangential speed of table drift 10 m/min, axial table drift 1 mm per stroke, and thickness of removed layer reached 0.02 mm. The grinding wheel was trued up after each sample in order to maintain constant grinding conditions.
Annealed samples were at disposal so that necessary unstressed lattice plane spacing could be obtained.
Cooling
during grinding
A result of mechanical surface treatments with a tangential component like milling, turning or grinding is plastic deformation in the near-surface region producing residual stress due to the greater elastic relaxation of this region compared to the bulk. The mechanical interaction between the grinding wheel and workpiece is responsible for the increase of temperature in the area where friction takes place. A part of the emergent heat is conducted into material and taking into account inhomogeneous temperature fields, the thermal stresses arise consequently. The creation of heat may even lead to thermal damage of the workpiece, which may severely reduce its fatigue and wear life. A high level of tensile stresses may be included among thermal damage. Various cooling techniques are applied in order to conduct the heat away from surface, which not only subdue tensile stress in material but also lubricate the grinding zone to reduce the friction between the grinding wheel and the workpiece. Both gaseous and liquid cooling mediums are used. There are several experimental techniques used to evaluate the efficiency of cooling. The distribution of residual stresses into material is studied, the level of lubrication may be estimated from the size of tangential and normal forces detected with piezo-electric dynamometers; the temperature during grinding may be measured either by thermocouple [3] or by CCD based Infra-Red imaging system [4].
In the experiment, Cimtech A31F was used as cooling liquid; the amount of incoming liquid was 5 l per minute. The source of cooling air was a Ranque-Hilsch vortex tube, four temperatures of air were chosen: 0 °C, -10 °C, -20 °C, -28 °C. For comparison, one sample was ground without cooling.
Experimental
technique
The X-ray diffraction technique is a well developed, and thus a widely used tool for measurement of residual strains in polycrystalline materials. It is based on evaluation of lattice parameter. The position shift of the peaks in the X-ray intensity pattern reflects the changes of the lattice plane spacing dhkl. The lattice strain ehkl is defined as a relative change of dhkl. The measured strain ehkl defined by the azimuth j and the tilt angle y can be expressed as [5]:
![]() . (1)
. (1)
If the strain is measured in six independent directions (j, y), the complete symmetrical strain tensor comprising of six components may be evaluated. Method sin2y stems from the proportionality of the measured strain ejy to sin2y. There are several limitation to the application of the sin2y method : the texture of the investigated sample should not be pronounced and the size of crystallites should be small (i. e. less than 10 mm).
Differentiating the Bragg’s law, it can be found out that the most convenient Bragg’s angles are θ → 90°, and hence {211} diffractions of a-Fe were investigated with an w-diffractometer and CrKa radiation (λ = 0.228965 nm; U = 30.5 kV, I = 24.5 mA) equipped with a scintillation detector. Differential y–method, when azimuth is kept constant and tilt is changing, was employed. Measuring was carried out in the grinding direction (j = 0°, 180°), in the transverse direction (j = 90°, 270°) and in direction defined by azimuths j = 45°, 225°; corresponding to positive (j = 0°, 45°, 90°) and negative (j =180°, 225°, 270°) tilt. For each azimuth 9 tilts defined by sin2y = 0; 0.1; 0.2; ...0.8, were realised. The position of diffraction maximum was established as a centroid of diffracted doublet CrKa1a2 after Lorentz, polarization and temperature expansivity corrections [6]. The obtained 2q211-vs.-sin2y exhibit psi splitting for azimuths j = 0°, 45° as shown in Fig. 1.
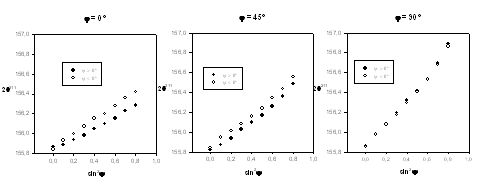
Figure 1. Dependences of Bragg's angle
2q vs. sin2y for bearing steel CSN 41 4220 ground with
a liquid coolant.
The calculation of stress tensor is done from strain tensor by using of generalized Hook’s law [6]:
 , (2)
, (2)
where ½s2 = 5.76•10-6 MPa-1 and s1 = 1.25•10-6 MPa-1 are X-ray elastic constants calculated according to Eschelby-Kröner (Hill) method [6] for measured a-Fe {211} diffraction planes. Evaluated residual stresses are mean values for the volume defined by the cross section of X-ray beam and by the penetration depth of the used radiation.
Due to the limitations of X-ray penetration depth, the X-ray diffraction technique can be used only for surface layers of few micrometers in thickness. The course of the effective penetration depth for the Bragg’s angle q = 80° and CrKa radiation is on Fig 2. More powerful tools like synchrotron radiation or neutron diffraction can be used for nondestructive evaluating of stress gradients. Modification of sin2y method called cosy method [7] exploits low divergence, high flux, adjustability of the wavelength of the synchrotron radiation, which allows the control of penetration. Neutron diffraction has an advantage of high penetrability (several centimeters) and possibility of defining the diffracted volume using the so called “pencil beam” [8].
In the case of conventional X-ray diffraction apparatus, investigation of stress depth profiles is done in combination with electro-chemical polishing. The process of anodic dissolution takes place during electro-chemical polishing while anode is formed by the sample itself; the product of this process is the solution with high electrical resistance which is embedded into microscopic wells in the surface of the sample and therefore preferential removal of roughness proceeds.
The LectroPol-5 by Struers, an apparatus for automatic, micro-processor controlled electrolytic polishing and etching of metallographic specimen, was used for surface layer removal. The depth profile of residual stresses was studied for three samples with various cooling during grinding.
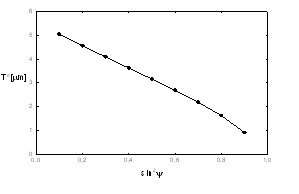
Figure 2. Effective penetration depth
for CrKa radiation into
ferrous materials, w-goniometer, q = 80°.
Residual
stress distribution due to grinding
The conception of residual stress distribution in near surface layers of a ground sample stems from the inhomogeneous plastic deformation and equalization of temperature between the sample and its environment. It can be supposed that the ground surface itself is the point from which the heat is conducted into material. The amount of this heat e is affected by array of factors, among them the most decisive being the material of abrasives, the cooling of surface, the parameters of grinding etc. The value of e for conventional grinding conditions without cooling, corundum grinding wheel and common steels was established between 60 and 75 percent [9]. The quasi-steady temperature profile throughout the whole sample can be analytically computed according to the model of triangular heat source proposed by Jaeger [10, 11], if the e is known. The temperature profile is dramatically changing in the course of time as the whole system strives to get into the equilibrium state. The temperature on the very surface is decreasing rapidly forming a barrier for cooling of the near surface and bulk areas which are yielding to the thermal expansions. It is therefore presumed that the residual stress is becoming “more tensile” with increasing depth till the point of maximum from which it decreases again slowly reaching the unstressed state. However it should be emphasized that the final state of residual stress is determined not only by the whole process of grinding and by the way of reaching the equilibrium state, but also by the “status quo ante the grinding”.
Psi
splitting
Evaluation of experimental data from measuring in positive and negative tilt (rotating specimen by 180°) corresponds to different values of residual stress, which means that the stresses obtained in the grinding direction differ from those obtained in the opposite direction, even if all geometrical conditions between the incident X-rays and the samples are maintained.
A method for evaluation of strain tensor was proposed by Dölle and Hauk [12]. From the relation (1) can be derived that shear stress σ13 is responsible for splitting in azimuth j = 0° and shear stress σ23 for splitting in azimuth j = 90°, both sheer stresses σ13 and σ23 contribute to the splitting in j = 45°. It was observed that the stress component σ13 diminishes with increasing distance from the surface and therefore the psi splitting in azimuth j = 0° vanishes. The shear stress σ23 was in all performed measurements equal to zero with respect to the experimental accuracy and therefore no splitting in direction perpendicular to the grinding was found.
Results
Both conditions for application of sin2y method were thoroughly explored. Firstly, the measurement of texture was performed, namely the unrolled spiral records of pole figure [13] were obtained. Secondly, backscattering Debye - Scherrer patterns contained continuous homogeneous diffraction rings and gave evidence of a proper crystallites’ size.
The complete tensor of macroscopic stress was evaluated for surfaces of the six investigated samples. With respect to the declining dependency of effective penetration depth versus sin2y (Fig. 2), the calculation was carried out only for five tilts corresponding sin2y = 0; 0.1; 0.2; 0.3; 0.4. The results are shown in Tab. 1 and Tab. 2.
Table 1. Components of stress tensor
for ground samples of bearing steel CSN 41 4220.
|
Coolant |
s11
[MPa] |
s22
[MPa] |
s33
[MPa] |
s13
[MPa] |
s23
[MPa] |
s12
[MPa] |
|
air 20°C |
105 ± 13 |
-132 ± 16 |
61 ± 8 |
18 ± 2 |
9 ± 2 |
-24 ± 6 |
|
liquid |
-156 ± 11 |
-318 ± 11 |
39 ± 6 |
20 ± 2 |
-2 ± 2 |
39 ± 6 |
|
air 0 °C |
118 ± 20 |
-133 ± 14 |
70 ± 9 |
14 ± 4 |
-2 ± 2 |
-1 ± 12 |
|
air -10 °C |
166 ± 11 |
-101 ± 11 |
60 ± 6 |
21 ± 2 |
7 ± 2 |
-12 ± 4 |
|
air -20 °C |
-2 ± 6 |
-204 ± 7 |
70 ± 3 |
-18 ± 2 |
-5 ± 2 |
34 ± 7 |
|
air -28 °C |
-1 ± 13 |
-217 ± 10 |
57 ± 6 |
17 ± 3 |
-3 ± 1 |
12 ± 5 |
Table 2. Components of stress tensor for ground
samples of stainless steel CSN 41 7135.
|
Coolant |
s11
[MPa] |
s22
[MPa] |
s33
[MPa] |
s13
[MPa] |
s23
[MPa] |
s12
[MPa] |
|
air 20°C |
-7 ± 21 |
-262 ±18 |
52 ± 10 |
-45 ± 3 |
3 ± 22 |
-3 ± 3 |
|
liquid |
-169 ± 25 |
-340 ±31 |
56 ± 15 |
-30 ± 5 |
-3 ± 18 |
2 ± 4 |
|
air 0 °C |
101 ± 30 |
-180 ±29 |
88 ± 16 |
30 ± 14 |
1 ± 18 |
1 ± 9 |
|
air -10 °C |
-171 ± 21 |
-387 ±36 |
45 ± 15 |
23 ± 3 |
25 ± 15 |
1 ± 8 |
|
air -20 °C |
-16 ± 12 |
-211 ±18 |
67 ± 8 |
44 ± 8 |
-15 ± 22 |
5 ± 4 |
|
air -28 °C |
-154 ± 18 |
-347 ±15 |
38 ± 9 |
37 ± 4 |
8 ± 15 |
3 ± 6 |
The depth distribution of residual stresses was studied for both materials for three samples, cooled by ambient air, by liquid coolant and by flow of cold air of temperature -28 °C. As the gradient of residual stress in the near-surface area of 100 mm in depth has pronounced impact on the surface quality, the layer removal was performed by comparatively small steps. All measurements were done in four azimuths j = 0°, 90°, 180°, 270°. As the shear stress σ13 decreased in the depth, the psi splitting became less pronounced (Fig. 5). For that reason measurements in further depths were performed in just two azimuths j = 0°, 90°.
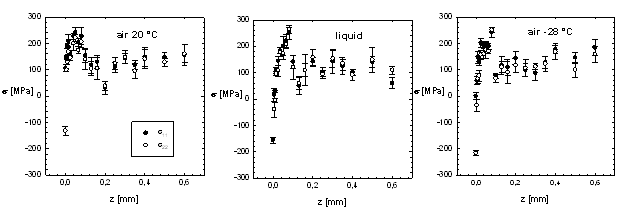
Figure 3. Distribution of residual
stresses s11 and s22 in the samples
made of bearing steel ČSN 41 4220 ground on ambient air, with liquid
cooling and with cooled air of temperature -28 °C.
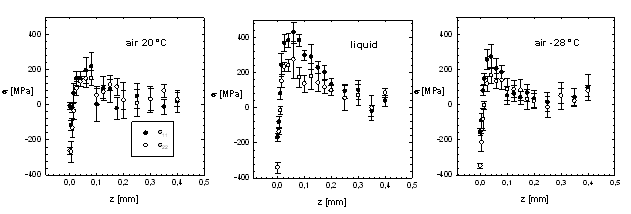
Figure 4. Distribution of residual
stresses s11 and s22 in the samples
made of stainless steel ČSN 41 7135 ground on ambient air, with
liquid cooling and with cooled air of temperature -28 °C.
Conclusions
Measurements of residual strains on the surface of samples proved that grinding causes anisotropic triaxial state of residual stress with psi splitting in the direction of grinding and in the direction defined by azimuth j = 45°.
The absolute values of stress s22 on the surface are usually larger than s11 (the only exception being the sample of bearing steel ground with cooled air of -10°C).
The cooling using liquid appears to be very effective in heat conduction from the surface as the diagonal components of the residual stress tensor are minimal. In this case the s11 is distinctively compressive and s22 is among the maximal compressive stresses observed on all the surfaces.
The shear stresses are not influenced by the way of cooling. Cooling with cold air from Ranque-Hilsch vortex tube appears to be effective only for temperature lower that -10°C when the diagonal stress components are becoming more compressive.
Computation of stress distortion due to the electro-chemical removal of layers was performed using finite element method [14]. It has been proved that such distortions can be neglected if the removed area is in the centre of the sample and the removed volume is negligible with respect to the samples volume.
For the bearing steel, the diagonal components s11, s22 of macroscopic residual stress tensor increase from their surface values till the maximum of about 250 MPa (Fig. 3), this state is reached in the depth of 80 mm. From this point a decrease to the minimal level of about 50 MPa in the depth of 160 mm is observed. All three samples made of bearing steels exhibit further increase onto about 150 MPa with the increasing depth. This finding will be further examined and discussed; it might be caused by the state of the samples before the actual grinding.
The maximum in the distribution of diagonal stress components s11, s22 of the samples made of stainless steel varies according to the way of cooling. The maximum in stress distribution of sample cooled by liquid is distinctively higher than in the two other forms of cooling (Fig. 4). The samples made of stainless steel do not exhibit any further increase in stress with increasing depth after the maximum was reached.
As can be seen from the Fig. 5, the psi splitting slowly vanishes as the shear component s13 diminishes. Using the quadric interpretation of tensor as a stress ellipsoid, it can be said that the inclination of the principal axes of the stress ellipsoid in respect to the samples surface is decreasing with the increasing depth.
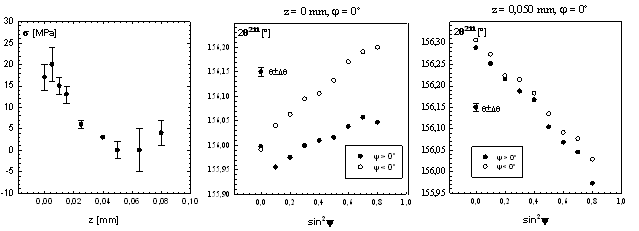
Figure 5. Distribution of residual shear
stress s13 in the sample from
bearing steel ground with cooled air of temperature -28 °C and dependences 2q211-vs.-sin2y at the surface and at the depth of 50 mm.
Acknowledgements.
The research was supported by the Project № 106/07/0805 of the Czech Science Foundation and by the Project MSM 6840770021 of the Ministry of Education, Youth and Sports of the Czech Republic.
References
[1] Hauk V.: Structural and Residual Stress Analysis by Nondestructive Methods. Elsevier, 1997.
[2] Lee S.-J., Lee Y.-M., Chung M.-Y.: Metal removal rate of the electrochemical mechanical polishing technology for stainless steel – the electrochemical characteristics, Proceedings IMechE Vol. 220, January 2006, p. 525-530.
[3] Hwang J., Kompella S., Chandrasekar S., Farris T. N.: Measurement of Temperature Field in Surface Grinding Using Infra-Red Imaging System, ASME, Journal of Tribology Vol. 125, April 2003, p. 377 – 383.
[4] Outwater J. O., Shaw M. C.: Surface
Temperatures in Grinding, Trans. ASME Vol. 74, 1952, p. 73 – 86.
[5]Macherauch
E., Müller P.: Das sin2y -Verfahren der röntgenographischen Spannungsmessung, Zeitschrift für angewandte
Physik Vol. 13, 1961, p. 33 – 38.
[6] Kraus, I. – Ganev, N.: Residual Stress and Stress Gradients, In: Industrial Applications of X-Ray Diffraction. New York: Marcel Dekker, 2000, s. 793-811.
[7] Akita K., Kubota K., Yoshioka Y., Suzuki H.: Analysis of Depth Profiles of Residual Stress Using Synchrotron Radiation, Material Science Forum Vols. 404 – 407, 2003, p. 293-298.
[8]Webster P. J.: Neutron strain scanning, Neutron News Vol. 2, No. 2, 1991, p. 19-22.
[9] Kohli S., Guo C., Malkin S.: Energy Partition to the Workpiece for Grinding with Aluminum Oxide and CBN Abrasive Wheels, Transactions of ASME Vol. 117, May 1995, p. 160 – 168.
[10] Jaeger J. C.: Moving Sources of Heat and Temperature at Sliding Contact, Proceedings of Royal Society New South Wales Vol. 76, 1942, p. 203 – 224.
[11] Carslaw H. S., Jaeger J. C.:
Conduction of Heat in Solids. Oxford Science Publication, second edition, 1959, p. 266-270.
[12] Dölle H.,
Hauk V., Jühe H. H., Krause H.: Zur röntgenographischen Ermittlung dreiachsiger
Spannungszustände allgemeiner Orientierung, Materialprüf. 18, Nr. 11, November
1976, p. 427 – 431.
[13] Wassermann G., Grewen J.: Texturen metallischer Werkstoffe. Springer-Verlag, Berlin, 1962.
[14] Ganev N., Frydrýšek K., Kolařík K.: Possibilities of FEM for verification of X-ray measurements of residual stresses depth distribution, 9th international scientific conference of Applied mechanics 2007, ISBN 978 - 80 - 248 - 1389 – 9.