Structure
Characteristics of Al-plates Joined by Friction Stir Welding
N. Ganev1,
J. Marek1, P. Sláma2
1Department of Solid State
Engineering, Faculty of Nuclear Sciences and Physical Engineering, Czech
Technical University in Prague, Trojanova 13, 120 00 Prague 2, Czech Republic
2Research Institute for Metals Ltd.,
Panenské Břežany, 250 70 Odolena Voda, Czech Republic
The aim of the
contribution is to give information about Friction Stir Welding (FSW), an
emerging technology of joining metals that offers benefits over traditional
fusion welding processes. The presented results of X-ray diffraction and
metallographic analysis confirm that although FSW has been put to use in
production of boats and space launch components, there is still a good deal to
be studied about the basic mechanism and the details of the process.
1. Friction stir welding
1.1 Introduction
Friction stir
welding (FSW) is a newly developed method of solid phase welding invented in
the early 1990s by The Welding Institute (TWI) in Cambridge, United Kingdom [1]. It uses
a relatively simple process in which a specially shaped cylindrical tool is
rotated and plunged into the joint line between the pieces to be welded. The
frictional heat generated by the welding tool and the surrounding material
causes softening and allows the tool to be moved along the joint line. The
material is plasticized and transferred from the leading edge of the tool to
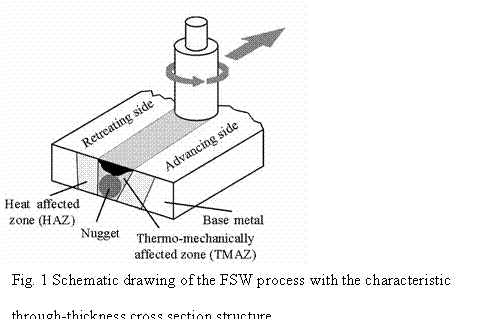
the trailing edge, leaving a solid-phase bond between the two pieces (Fig. 1).
The process may be described as a combination of in situ extrusion and forging.
Friction-stir-welded
materials have a characteristic through-thickness cross section illustrated in
Fig. 1.The weld forms a consolidated nugget of fine-grained, fully
recrystallised material surrounded by a thermo-mechanically affected zone
(TMAZ) which usually has a significantly different microstructure. Further away
from the weld is a heat-affected zone (HAZ), with the unaffected base material
on the outside. The advancing zone is the side of the base material, where the
motion and rotation direction of the tool are in the same direction. On the
retreating zone the rotation direction is opposite to the tool movement (Fig.
1).
1.2. Process advantages and
limitations
The majority of
the process benefits stem from the fact that FSW is a solid-state process:
- Because there is no
melting of the material, the majority of problems normally associated with
conventional welding are eliminated, including porosity, solidification
cracking, and shrinkage.
- Since the shrinkage
associated with the liquid/solid transformation is eliminated, distortion
and residual stress are minimized.
- The process requires no
filler material, so parent metal chemistry is maintained with no chemical
segregation.
- FSW has the ability to
join materials that are difficult to fusion-weld.
- Although the technique is
more reliable and maintains higher material properties than conventional
welding methods, friction stir welding has had a major drawback of
reliance on a single-piece pin tool. The pin is slowly plunged into the
joint between two materials to be welded and rotated at high speed. At the
end of the weld, the single-piece pin tool is retracted and leaves a
keyhole unacceptable when welding cylindrical objects such as drums,
pipes, and storage tanks.
- Another drawback is the
requirement for different-length pin tools when welding materials of
varying thickness.
1.3. Selected applications of FSW in
construction area are as follows [1, 2]:
- construction equipment
(truck bodies, mobile cranes),
- transportation including
railroad industry (high speed trains, underground carriages),
- bridge (aluminium
components),
- panels made from
aluminium, copper or titanium,
- window frames,
- heat exchangers and air
conditioners,
- pipe fabrication, etc.
Although FSW
has been put to use in full-scale production of ferry boats and space launch
components made of aluminium, there is still a great deal to be learned about
the basic mechanisms and the details of the process. In addition, a great deal
of work must be performed to extend the benefits of FSW to other, more
refractory materials.
2. The sample under
investigation and the experimental methods employed
Two plates of
dimensions 110×175×6 mm3 from the AlSi1MgMn alloy EN AW6082 were
butt-welded along the longer side using Friction Stir Welding in the GKSS
Research Centre in Geesthacht, Germany. The width of the resulting weld is 14
mm.
2.1 Mapping of the surface residual stresses of
the sample
Prior to applying
an X-ray diffraction method for residual stress measuring, a set of back
reflection patterns was taken. The incident beam of CrKα radiation
collimated by a cylindrical diaphragm 1.7 mm in diameter impinged the surface
perpendicularly. Diffraction rings (222) were detected on a film placed approx.
57 mm from the analysed surface.
Since the
samples dimensions did not enable applying the classic “sin²ψ” method
with an ω – or ψ – goniometer, the “one tilt” method with no
reference substance [3] was used for residual stress determination. The
incident CrKα beam (1.7 mm in diameter) reached the sample surface at an
angle of ψ0 = 45º in the longitudinal and transversal
directions with respect to the weld centreline and surface components σL
and σT, respectively were determined. The record of the {222}
Al diffraction line was obtained from a fully automated Zeiss microdensitometer
and evaluated on a PC. For this experimental arrangement the surface stress
σφ can be written as
![]()
where θ is
the Bragg´s angle, η = 90º – θ, D is the distance between the
film and the sample, and ![]() is the eccentricity of
the diffraction ring [3]. The X ray elastic constant ½s2 = 18.56·10–6
[4] was used in residual stress calculations.
is the eccentricity of
the diffraction ring [3]. The X ray elastic constant ½s2 = 18.56·10–6
[4] was used in residual stress calculations.
2.2 X-ray diffraction texture analysis
Two samples of
dimensions 14×30×6 mm3 were cut from the weld and their thickness
was reduced by bottom milling to a value of 3 mm. Both the samples were
arranged close to each other in the holder of a Siemens texture goniometer, so
the measured area was 28×30 mm2. Texture analysis on the surface of
the weld as well as in the middle of its thickness was performed with CoKα
radiation by X-ray back reflection method on the atomic planes Al (111), (100),
(110).
ODF
representation in the stereographic projection SP(001)
The orientation
distribution function (ODF) is calculated by the software popLA [5] as a
function of Euler angles f2, F, f1 in the
sampling of 5 degrees. These angles define a general ideal orientation of a
single crystal (hkl)[uvw]. The pole of the planes (hkl) is
determined by the angles f2 and F, the pole of
the direction [uvw] is situated on a corresponding grand circle determined by
the angle f1. The positions of the poles (hkl) and
[uvw] in the standard stereographic projection are calculated from the ODF
function with the aid of software ODFSP5.EXE [6], and symbols corresponding to
the ODF intensity are drawn in the SP(001) plot. The poles (hkl)
represented by lozenges are situated in quadrant IV. and poles [uvw]
represented by squares are drawn in quadrants II. and III. The size of the
symbol corresponds to the relative value of ODF intensity in percent. The
software enables also to superimpose an ideal orientation over the experimental
ODF projection.
2.3 Metallographic analysis
The structure
of the weld was observed under the optical microscope Nikon Epiphot 200.
The samples were first electrolytically etched in a Barker solution.
3. Results and their
discussion
3.1 Back reflection “mapping” of the sample
surface
Back reflection
photographs have been taken from the weld surface as well as from the surface
of the basic material. The diffraction patterns of the weld surface correspond
to a fine-grained polycrystalline material with a weak preferred orientation of
the crystallites, which changes only slightly from the weld centreline. On the
other hand, the basic material has substantially grater crystallites that give
rise to a discrete diffraction line, on whose background a low-intensive smooth
pattern, corresponding to surface plastically deformed crystallites, is
discernible.
3.2 Surface distribution of macroscopic
residual stresses
The discrete
character of the Al (222) diffraction line of the basic material does not
enable applying the “sin²ψ” method on its surface; thus the analysis
of the state of residual stresses was performed only on the weld surface. The
measurements carried out on 9 equidistant (the distance being 1.5 mm)
positions, in both the longitudinal and transversal directions with respect to
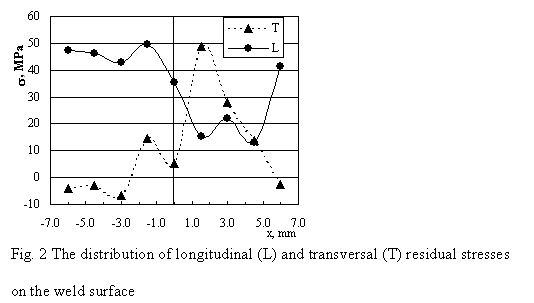
the weld centreline, are outlined in Fig. 2. Realising that the inaccuracy of
the experimental values is less than 15 MPa, it is evident that:
- the surface state of
residual stresses is inhomogeneous.
- The non-uniformity is
more pronounced in the transversal direction (σT), where
the maximum span between the stress values found is approx. 60 MPa.
- Most of the stresses
obtained are tensile; the few compressive stresses are less than
10 MPa.
- The courses of residual
stresses σL and σT are different and
asymmetric with respect to the weld centreline.
These findings are in good agreement with the results obtained using
other techniques for residual stress determination as presented in the papers [7 – 9].
3.3 X-ray diffraction texture analysis
The texture
distribution functions for the weld surface and for the middle of its thickness
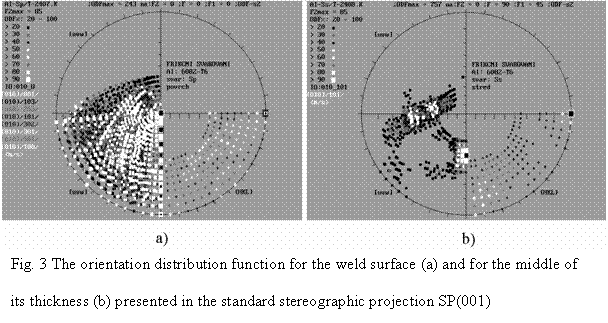
are presented in the stereographic projection SP(001) in Fig 3. As one can see
- the texture
obtained from the weld surface is weak, with a maximum value of
ODF obtained by popLA ODFmax= 243. Crystallographic
directions [uvw] coplanar with the sample surface and lying in the planes
(HKL) do not have any preferred orientation with respect to the weld
centreline. Continual bands of poles [uvw] in quadrants II. and III. (Fig.
3a) give evidence of it.
- The texture in the
middle of the weld thickness is more pronounced (ODFmax=
757) and has the ideal orientation of the (010)[101] type.
3.4 Metallographic analysis
Metallographic
analysis of samples cut perpendicular to the weld centreline was carried out.
Qualitative macro and micro-characterisation was performed. Micrographs were
taken at different positions of weld cross-section. The most important
observations could be summarized as follows:
·
Particles of several different intermetallic secondary
phases are present in the investigated alloy. The majority of the particles are
phases containing the usual impurities of Al, i.e., Fe and Si and the alloying
elements Mg, Mn, Zn, Si. The large amount of the Mg2Si phase has
been identified in the alloy. The particles of intermetallic phases are
relatively coarse, which is indicative of the fact that all the materials used
were prepared from direct-chill cast alloys.
·
The TMAZ and HAZ of the weld are not large and they
cannot be well distinguished.
·
The grains in the welds are much finer than those of
the parent materials.
4. Conclusions
1. The results
of both the back reflection “mapping” of the sample surface and metallographic
analysis show that while the structure of the basic material is very
coarse-grained, the material of the weld is noticeably fine-grained and the
boundary between the both structures is well pronounced.
2. An
inhomogeneous field of state residual stress was found on the weld surface with
predominant tensile stresses (Fig. 2). The asymmetric courses of residual
stress distributions are, most probably, a result of the asymmetry of the FSW
process, i.e., the existence of advancing and retreating zones (see Fig. 1).
The results obtained are in good correspondence with those published by other
authors, e.g. in [7 – 9].
4. The
qualitative difference between the texture on the weld surface and the texture
in the middle of its thickness could be explained by different cooling rates of
these volumes. While the rapid cooling of the surface does not “allow” the
material to form a pronounced recrystallization texture, in the middle of the
weld there are favourable conditions for creating a strong texture.
References
[1] The Welding Institute Web site <http://www.twi.co.uk/>
[2] NASA Web site <http://technology.nasa.gov/>
[3] I.
Kraus, N. Ganev: Residual Stress and Stress Gradients, In: Industrial
Applications of X-ray Diffraction, Eds. F.H.Chung and D.K.Smith, Marcel Dekker,
Inc., New York-Basel, 2000; pp. 793-811
[4] I.
Kraus, N. Ganev: Engineering applications of diffraction analysis (in Czech),
CTU Publisher, Prague 2004, 171 p.
[5] J. S.
Kalend, U. F. Kocks, A. D. Rollett, H. R. Wenk: popLA, prefered
orientation package, Los Alamos 1993.
[6] J.
Marek, in: Materials Structure, Vol. 8, no. 1 (2001), pp. 29 – 37.
[7] R. V.
Martins, V. Honkimäki, in: European Synchrotron Radiation Facility 2003
Highlights, ERSRF, Grenoble 2004, pp. 54 – 55.
[8] M. B.
Prime, R. J. Sebring et.al., in: proceedings of the 2004 SEM X International
Congress & Exposition on Experimental and Applied Mechanics, June 7 – 10,
2004, Costa Mesa, California USA, paper number 144 (CD-ROM proceedings.
[9] M. A.
Sutton, A. P. Reynolds, D.-Q. Wang, C. R. Hubbard, in: Journal of Engineering
Materials and Technology, Vol. 124, APRIL 2002, pp. 215 – 221.

The research has been
supported by the project MSM 6840770021.

