NanoTest™ NT 600 - a device for analyses of mechanical properties of materials
R. Čtvrtlík, M. Stranyánek, P. Boháč, L. Jastrabík
Institute of Physics of Academy of Sciences of the Czech Republic, Na Slovance 2, 182 21 Prague, Czech Republic
Keywords: NanoTest™, nanoindentation, Oliver-Pharr method, scratch test, impact test, impulse test, acoustic emission, pin on disc
Abstract
Thin films and coatings technology have become the crucial aspect in a wide range of production processes. It is used with success for instance in electro technical industry, electronics, optics, mechanical engineering, energetics and medicine. On this account the mechanical properties metrology of thin films and coatings has become very important due to their optimization as well as high-quality production. There are numbers of devices available for the measurement of these properties, either specialized for certain test or universal which are available to carry out the entire analysis of mechanical properties of thin films and surfaces. The special rank belongs to the modular measuring system NanoTest™ (Micro Materials Ltd.) significant by its unique construction, which enables horizontally loading of the specimen.
Introduction
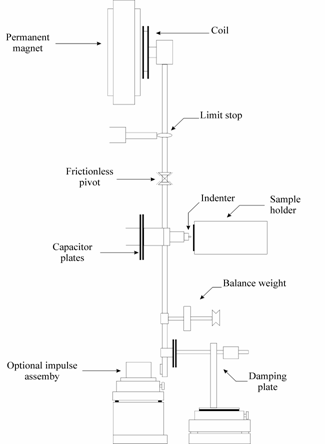
Modular measuring system NanoTest™ NT600 is a device designed for measurement of mechanical properties of thin films and coatings. The platform can measure hardness, evaluate elastic modulus, adhesion, wear as well as fracture and dynamic properties. At the heart of the NanoTest™ system there is a pendulum that can rotate on a friction-less pivot. A coil is mounted at the top of the pendulum; as a coil current is applied, the coil is attracted towards a permanent magnet, producing motion of the diamond towards the sample and into the sample surface. The displacement of the diamond is measured by means of a parallel plate capacitor, one plate of which is attached to the diamond holder; when the diamond moves, the capacitance changes, and this is measured by means of a capacitance bridge [1].
The NanoTest™ flexibility consists directly in its modular conception. Number of measuring methods and techniques can be very easily accessed by mere implementation of additional modules such as friction probe, microscope with high resolution, AFM, acoustic emission system, pin on disk tribometer, etc. Furthermore, it is possible to perform the named tests at high temperature.
The basic platform consists of four independent modules which enable indentation, scanning, dynamic impact and impulse tests. For all these modules can be used either the low load head (0,1-500 mN) for films thickness of 20 nm - 5 mm or the high load “MicroTest” head (0,1-20 N). High load head is suitable for investigation of layers of thickness up to 50 mm. The whole measuring system operates on anti-vibration table in a special cabinet in order to minimize thermal drift, reduce air turbulence upsetting the NanoTest™ pendulum and provide sound-proofing to reduce acoustic disturbance. System control and data collection are completely assured by personal computer by means of special software, communication proceeds over IEEE bus [1].
 Nanoindentation
Nanoindentation is an important and effective
experimental ![]() method. It is extensively used to estimate the plastic and elastic
properties of thin films and surface layers of submicron thickness. Through
nanoindentation test, the material parameters, such as hardness, Young’s
modulus, yield strength, and strain hardening exponent, as well as fracture toughness can be estimated. The examination
principle is the penetration of a diamond tip of known proportion and geometry
into the investigated surface at accurately defined loading force and
subsequent analysis.
method. It is extensively used to estimate the plastic and elastic
properties of thin films and surface layers of submicron thickness. Through
nanoindentation test, the material parameters, such as hardness, Young’s
modulus, yield strength, and strain hardening exponent, as well as fracture toughness can be estimated. The examination
principle is the penetration of a diamond tip of known proportion and geometry
into the investigated surface at accurately defined loading force and
subsequent analysis.
Testing by NT600 is based on Depth Sensing
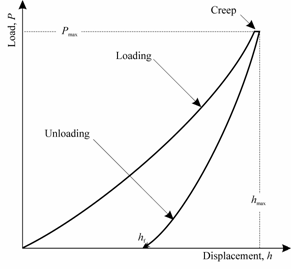
Indentation (DSI) at which the loading force P and corresponding indentation depth h is continuously recorded during the whole indentation cycle. In
a typical indentation cycle, load is applied to an indenter that is in contact
with the surface of a specimen. The load and depth of penetration are recorded
as load is applied from zero to a pre-defined maximum and then from maximum
load back to zero [2]. As the indenter is held at maximum load for a desired
time, this period enables to investigate creep. A schematic illustration of a
typical load-displacement curve is presented in Fig. 2. There have been developed several analytical
approaches for ![]() analyzing
of the measured load-displacement data. NT600 uses for evaluation of
hardness H and reduced modulus Er the method by Oliver and
Pharr [3], which extends the approach by Doerner and Nix [4].
analyzing
of the measured load-displacement data. NT600 uses for evaluation of
hardness H and reduced modulus Er the method by Oliver and
Pharr [3], which extends the approach by Doerner and Nix [4].
In most cases the three-sided pyramidal Berkovich indenter with an included half-angle of 65,27° is used. Its geometry gives the same ratio of projected area to indentation depth as Vickers indenter (four-sided pyramid). The Berkovich indenter is preferred for nanoindentation due to the fact that three facets theoretically converge to a single point [5].
Oliver-Pharr method
The most common method for evaluation of hardness and reduced modulus from the load-displacement data obtained with Berkovich indenter was proposed by Oliver and Pharr in 1992. This procedure consists in the analysis of unloading process schematically shown in Fig. 3.
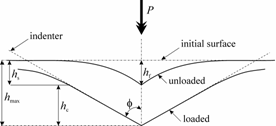
Fig. 3 Schematic
representation of the unloading process.
The data analysis starts with fitting the unloading curve to the power-law relation
![]() ,
(1)
,
(1)
where P is the indentation load, h is indentation depth, hf is the depth of residual impression after complete unloading, and a, m are empirical fitting parameters. The unloading stiffness S is defined as the initial slope of the unloading curve
![]() .
(2)
.
(2)
The widely used relationship for reduced modulus Er which relates projected area A and contact stiffness S is given by
![]() .
(3)
.
(3)
Elastic modulus of the specimen E has the following relationship with the measured reduced modulus Er
 ,
(4)
,
(4)
where Ei and ni are the elastic modulus and Poisson’s ratio of the indenter, n is the Poisson’s ratio of the specimen, respectively. For diamond, Ei = 1141 GPa and ni = 0,07 [6].
Projected area of the indenter A is defined as the cross-sectional area at contact depth hc, for ideal Berkovich indenter
![]() .
(5)
.
(5)
Function that relates projected area to the contact depth is called Diamond Area Function. Contact depth hc is the depth at which is realized contact between side boards of indenter and sample at maximal load (Fig. 3). It can be estimated after
![]() ,
(6)
,
(6)
where Pmax is the peak load and e is geometrical constant, for Berkovich indenter e = 0,75. Indentation hardness HIT is defined as the mean contact pressure and is given by
![]() .
(7)
.
(7)
Scratch test
Nano-Scratch test is one of the fundamental tests of mechanical properties at sub-micron scale and is used for their qualitative and quantitative characterization. The test is realized by the sliding of a stylus over the sample surface under either constant or progressively increasing load. During the whole experiment the load and stylus position are continuously recorded. In conventional scratch testing, scratches are generated on the sample using a diamond stylus usually a Rockwell [7]. For some special measurement the Cube-corner indenter is used.
During scratching a number of various processes occurs in the system coating-substrate. It is generally known that the failures of coating-substrate system in a scratch test arise owing to a combination of elasto- plastic indentation stresses, frictional stresses and residual internal stress present in the coating [7]. The increasing load leads to development of micro-cracks, cohesion failures and delamination. The minimum load at witch cracks occur is termed the lower critical load Lc1 [8]. This value is called as cracking resistance [10, 11], or scratch toughness [12, 13]. The total delamination is characterized by the value Lc2, see Fig. 4. Some authors define more critical loads corresponding with others perturbations of the coating-substrate system. The goal of scratch test is to find these critical loads Lc. NT600 can evaluate these values in several ways:
· by the detection of abrupt change in penetration depth,
· by a sudden change in the frictional force between the stylus and the surface,
· by microscopic observation,
· by means of acoustic emission.
Topographic test
Topographic test is performed only with very low load. It is suitable for investigation of surface relief or film thickness.
Multipass Wear Test
Abrasive wear performance can be estimated by means of Multipass Wear Test (MWT), which is based on successively altering of scratches and topography measurements over the same wear track. MWT uses a constant load for the scratches so that slower fatigue processes (e.g. crack growth) can be investigated [1]. Sometimes for adhesion measurement the friction probe is used, so the friction properties of the surfaces can be estimated. Significant for NT600 is possibility of the simultaneous utilization of the friction probe and acoustic emission transducer.
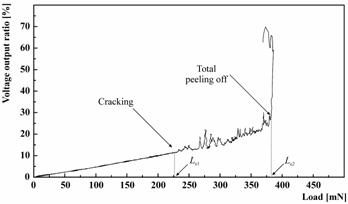
Fig. 4 Typical result of scratch test. [8]
Dynamic properties measurement
Investigation of mechanical properties of thin films at static loads is generally known. Utilization of such results in practice, where the surfaces are exposed to dynamic effects, is problematical. Often the material failure occurs sooner than predicted by static tests. That means that material characterization in terms of indentation (hardness, elastic modulus, and creep) and scratch test is in practice insufficient [13]. Therefore the dynamic investigation of the surfaces for practical use is necessary. NT600 can measure dynamic hardness, fracture and impact resistance, perform testing of contact fatigue, erosive wear or adhesion.
 For these purposes NanoTest™ NT600 utilizes Nano-Impact test. It is
in essence an accelerated ultra-low load fatigue wear test. The Nano-Impact
test is based on the sample oscillations which are generated by special
piezoelectric sample holder on which the specimen is fixed. Impact testing is
essential for surfaces where the ability to withstand repetitive contact is
critical to the product performance. This technique is very useful for design
and process optimization of new high durability thin films and coatings too.
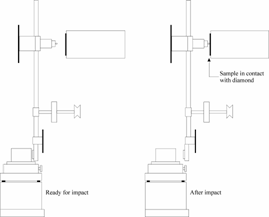
Certain modification of Impact test is Impulse test. The main difference between these two techniques is a motion generation. Whereas the Impact test is based on the sample vibrations, the impulse technique is based on pendulum oscillations (Fig. 5). In this case the pendulum motion is generated electromagnetically by means of special solenoid that is situated in the bottom part of pendulum, see Fig. 1. Another difference of these two techniques is the maximum applied load. For Impulse test the load is much lower due to totally different construction principle. High cycle experiments are commonly performed by oscillating the sample with Nano-Impact test. For low-cycle test with defined energy is used impulse test. The investigated surfaces can be compared in terms of these tests according to three basic criterions: type of failure, time to failure and energy to failure.
![]()
Acoustic emission
Abrupt changes in material cohesion caused due to changes in state of stress are accompanied by generation of transient acoustic waves (usually in the range of 150-300 kHz). This phenomenon is referred as the acoustic emission and is detected by means of ultrasonic sensor. Origin and growth of microcracks, interfacial bond failure and delamination are typical examples of events which produce acoustic emission.
The utilization of acoustic emission transducer allows obtaining additional detailed information on various processes which occur during indentation or scratch test - often till the failure is visible. For acoustic emission detection NanoTest™ NT600 uses piezoelectric transducer that is coupled with the measured specimen.
Pin on disc tribometer
Pin on disc testing is a technique usually used for investigation of wear resistance and sliding properties of surfaces. The principle of the examination is contact of the diamond indenter with the investigated disc-shaped sample. Pin on disc experiment is based on continuous monitoring of coefficient of friction by friction probe during sliding process. The main variable parameters which affect friction and wear are velocity and applied load. NanoTest™ NT600 allows to apply continuously increasing load in the range from 0,1 mN to 20 N and maximum velocity 120 revolution per minute. Except the broad extent of velocity and loading force there are other advantages like vertical disc orientation so material particulates fall off. There is possible define the stop conditions like maximum load, depth or friction force, too.
Conclusion
In this paper the possibilities of NanoTest™ NT600 for mechanical properties metrology were described. NT600 is a high-tech measurement system significant by its pendulum-based concept. Platform allows performing a number of tests such as nanoindentation, high temperature nanoindentation, scratch test and related test, dynamical tests (impact and impulse test, dynamic hardness measurement). Both pin on disc tribometer and acoustic emission transducer are also available. NT600 can measure hardness, evaluate elastic modulus, adhesion, wear as well as fracture and dynamic properties.
Acknowledgement
This work was supported by Institutional Research Plan No. AV0Z10100522.
References
1. B.D. Beake, et al.: Micro Materials NanoTest User Manual. Wrexham, 2004. Micro Materials Ltd.
2. A.C. Fischer-Cripps, Vacuum, 58 (2000) 569-585.
3. W.C. Oliver, G.M. Pharr, J. Mater. Res., 7 (1992) 1564-1583.
4. M.F. Doerner, W.D. Nix, J. Mater. Res., 1 (1986) 601-609.
5. T. Sawa, K. Tanaka, J. Mater. Res., 16 (2001) 3084-3096.
6. G. Simmons, H. Wang: Single Crystal Elastic Constants and Calculated Aggregate Properties: A Handbook. Cambridge, MA, 1971. MIT Press.
7. N.X. Randall, G. Favaro,
C.H. Frankel, Surf.
Coat. Technol., 137 (2001) 146-151.
8. S.
Zhang, D. Sun, Y. Fu & H. Du, Surf. Coat. Technol., 2004 (in
print).
9. A.A.
Voevodin, C. Rebholz, J.M. Schneider, P. Stevenson, A. Matthews, Surf. Coat. Technol., 73 (1995) 185-197.
10. E. Harrry, A. Rouzaud, P. Juliet, Y. Pauleau, M. Ignat, Surf. Coat. Technol., 116-119 (1999) 172-175.
11. A.A. Voevodin, J.S. Zabinski, Thin Solid Films, 370 (2000) 223-231.
12. A.A. Voevodin, J.S. Zabinski, J. Mater. Sci., 33 (1998) 319.
13. B.D. Beake, S.R. Goodes, J.F. Smith, Surf. Eng., 17 (2001)187-191.