Output
The experimental data and profile parameters
can be send to a file or to the printer. The graphs can be
printed or plotted on HP plotter or laser printer (HP-GL language
compatible).
Saving data on disk
Submenu Save file of Files (Main menu)
Saves the data or a part of current file in
current theta limits to disk in one of the following ways :
Rewrite original file (user is
asked for confirmation first)
New file
first complete filename must be given , since the original name
is offered, a care must be given to not erase the original file
Data file for Graph
the data are stored in columns : angles, intensities, calculated
intensities
BAR file
only set of peaks is saved in the columnar form: h k l position -
2 q
intensities,
PCX file
The graph is saved in PCX format. In main graphic menu activate
by pressing <ALT G>.
Output of profile parameters
Control of the output of the XRD line profile
parameters to plotter, printer, screen and file. Plot, Write,
Show parameters
Printing and saving.
Submenu Write.
Activate the output by selection of RUN
in the menu. Writing the profile parameters of the peaks of the
current phase of current file in a table form to printer, file
and screen, respectively. The parameters are written to all the
devices which are set to ON (Printer, Screen, Filename not
empty). If Filename is given, then the .PRN extension is attached
and the corresponding directory is attached to the name (see Environment). If the file already exists, then the parameters are
only attached to it.
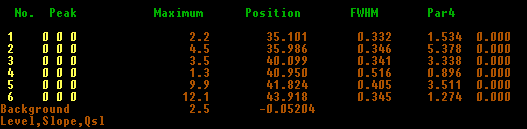
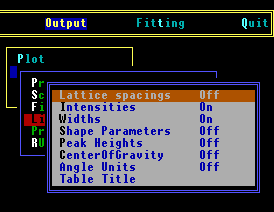 Listed
parameters
Listed
parameters
The parameters which are set to ON are listed in a table
form. In all cases the peak indices and positions are printed.
Optional parameters are : peak heights, integrated intensities,
widths (integral breadths, halfwidths), center of gravities and
shape parameters (see Functions), interplanar spacings. The item Angular
units of the submenu is a toggle defining whether
the widths are written in angular (2 theta) or reciprocal lattice
(1/d - in 10-10 m) units. A table title can be added.
Printer setting
The type of printing can be selected by Printer setting
which allow to switch on/off the following modes : Elite,
Compressed [default], Emphasized. This can be useful if the table
is too wide for the paper format, for example.
The commands are only valid for Epson line printers.
Last columns of the table (Type) inform on the
fitting function and corrections included
Type conventions :
Function type - Pearson ...................P
Asymmetric Paerson 1 ......................A
Asymmetric Pearson 2 ......................S
pseudo-Voigt .....................................V
Asymmetric pseudo-Voigt ...............X
Rational ...............................................R
Direct profile analysis .......................d
Undetermined parameters .................e
Correction -
polarization ........................................ p P
Lorentz ... .............................................l L
absorption ... ......................................a A
(upper case - correction performed after fitting)
Plotting the data.
Submenu Plot.
Activate the output by selection of RUN
in the menu. It sends the latest graph from the Graphics to HP
plotter (Com1 ON) and/or to the file specified in Filename. If Filename
is given, the .PLT extension is attached and file is
automatically created. If the Laser printer is ON then
the file for HP laser printer is written in HP-GL language.
Before sending of the graph some parameters can
be changed in Frame image and Plot image.
The paper size and orientation can be changed by Paper
image .
Frame image:
The axes description of the graph for plotter. The X-
and Y- limits are taken from the Graphics but can be changed
again here (Left, Right, Top, Bottom limits). The axis
labels can be modified or switched off/on together with ticks (Axis).
The division of both axes can be changed by Division X(Y).
Plot image:
The parameters of plotting data are taken from the
Graphics, but can be changed in the table for all files.
Pen ....................... pen number (1-6)
Symbol ................ see Symbols
Line type ............. see Line types
Symbol mode .......if ON, then in each point a symbol is plotted
regardless of line type
Peak label ............. if ON then indices of reflections are
written to the peak vertically
Peak marker .......... if TRUE then short lines as markers are
plotted at the top of the figure
The text, size and color of the title can be
modified by Text string , Label height , Label width , Slant (use
0-0.2) and Label pen .
Paper image:
The default parameters for the figure orientation and size are
loaded from the configuration file, but can be changed here.
Paper A4............... ON .... A4 format OFF
... A3 format
Rotate 90............... ON .... basic orientation for the
corresponding format, OFF .... rotation on 90 degrees
Velocity velocity of pen can be varied within the range 1-40
Origin.................... X(Y) origin of the figure in
milimeters
Graph Size............. X(Y) size of X(Y) axis in milimeters
Show parameters