EXPERIMENTAL ANALYSIS OF SHOT PEENING INDUCED RESIDUAL
STRESSES IN STEEL SAMPLES
P. Sedláka,1, N. Ganeva,2,
L. Berkab,3
a Faculty
of Nuclear Sciences and Physical Engineering, CTU in Prague
b Faculty
of Civil Engineering, CTU in Prague
1 sedlak@troja.fjfi.cvut.cz,
2ganev@troja.fjfi.cvut.cz, 3berka@fsv.cvut.cz
The aim of this contribution is to present a
comparative analysis of macroscopic residual stress distribution in the surface
layers of shot-peened steel samples by means of X-ray diffraction and
semi-destructive ring cutting technique.
Shot
peening process consists of the controlled
bombardment of the metal surface by spherical shot including steel shot, steel
and stainless steel pieces of wire, ceramic or glass beads. The shots may be
driven by a high velocity stream of air or liquid or by mechanical device in
which the shots are fed into a rotating wheel and thrown at the desired
velocity. The treatment causes plastic flow of the surface layers, thereby
inducing surface compressive stresses, change of microstructure and may cause
phase transformation in the surface layers.
However, there is not a simple relationship
between the parameters of shot peening and the course of residual stresses
induced in the surface layers of treated materials [1,2]. Final results of shot
peening depends on its conditions and on properties of
treated material including microstructure and crystallographic structure. Therefore
reliable methods of experimental stress analysis have to be applied for control
of the resultant state of residual stresses.
X-ray diffraction is the most accurate and best developed method of quantifying the
residual stresses produced by surface treatments such as shot peening, and the
method is widely used in automotive and aerospace applications. X-ray
diffraction is applicable to most polycrystalline materials, metallic or
ceramic, and is non-destructive at the sample surface.
Classical X-ray methods are limited to
relatively fine-grained materials; the most experimental errors are caused by
extreme preferred orientation and near-surface stress gradients.
A common mechanical methods for stresses
measuring involves the removal of stressed materials and measurement of the
strain relaxation in the adjacent material [3]. These methods are widely used
in industry for many years, mostly the hole drilling method with electrical
resistance strain gages. However, they are not straightforwardly applicable for
the residual stress determination of shot peened samples because of the steep
near-surface stress gradients. The removal area has form of ring in the ring
cutting technique and the strain relaxation is measured in the centre of
the ring. The use of finite element calculation is always needed for the
interpretation of results.
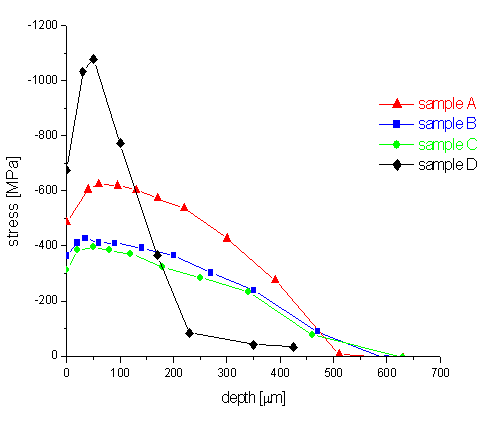
Shot peened plates were prepared from steels Cz
grade 12050 (sample A), Cz grade 14220 (sample B), Cz grade 19312 (sample C)
and PN 17145 (sample D).
A ω-goniometer was used to measure the
diffraction line α-Fe {211}. In order to
determine the stress gradient beneath the samples surface, the layers were
gradually removed by electrolytic polishing.
Distributions
of macroscopic residual stresses obtained are plotted
in Fig.1.
Surface residual stresses (MPa) obtained in two
directions φ = 0º and φ = 90º perpendicular each to another
are summarized in the Tab.1.
Tab.1.Surface residual stresses [MPa]obtained by sin²ψ method
Tab.2. Comparison of stresses [MPa]
evaluated by ring cutting method and calculated by FEM from depth profiles
|
Sample
|
Ring cutting
method
|
Calculated by FEM
|
|
|
|
|
|
|
|
|
|
|
|
|
|
|
|
|
|
|
|
|
The stereo-image technique for strain
measurement was used at the ring cutting method. The maps of strains were
obtained by the stereo-comparison of the images taken before and after the ring
cutting process. Stress relaxation was measured in the inner part of the ring.
The ring diameters were: inner radius 1.07 mm; depth 3.50 mm; width 1.70
mm. The ring was removed by
electric-corrosive process in petroleum bath. The values of stresses were
calculated from the maps of shifts using Hook’s law.
The results of both methods were compared using
the finite element analysis. Tab. 2 shows the comparison of stresses calculated
by finite element model with input from X-ray determined stress profiles with
stresses evaluated by the ring cutting method.
X-ray diffraction was found as the most
accurate method for quantifying the residual stresses but extremely
time-consuming (one depth distribution - about 10 hours) that can be a big
disadvantage in the process of quality control testing.
Ring cutting measurement is not so lengthy but,
on the other side, does not give any information about depth profile. The
values of surface stresses for both methods are in a good agreement despite
near-surface stress gradients in samples. Finite element analysis showed us
that more detailed analysis of measured shifts in the ring cutting method can
give additional information about depth of stressed layer. However, more
accurate system for shift measurement is needed.
|
|
|
Fig.1. Depth profiles of
residual stresses obtained by means of sin2y
method in the surface layers of shot-peened samples
|
ACKNOWLEDGEMENTS
The
research has been supported by the project Grant Agency of the Czech Republic
№106/03/1039.
[1] Kraus,I., Ganev,N.: in Industrial
Application of X-Ray Diffraction. New York, Marcel Dekker 1999.
[2] Noyan I. C., Cohen J. B.: Residual Stresses, Springer - Verlag, New York 1987
[3] Berka,L., Sova,M., Růžek,M.,
Fischer,G. Nové možnosti mechanických
metod analýzy zbytkových napětí. Sborník přednášek z 34. konference
EAN Plzeň 1996.
