High-resolution neutron diffraction performance for stress/strain measurements in polycrystalline materials
P. Mikula1,
M. Vrána1, V. Wagner2, K. Inoue3
1Nuclear Physics Institute and Research Centre Řež, Ltd., 25068 Řež near Prague, Czech Republic.
2Physikalisch-Technische
Bundesanstalt, Bundesallee 100, 38116 Braunschweig, Germany
3 Faculty of Science and Technology, Ryukoku University, Seta, Otsu 520-2194, Japan
|
|
|
|
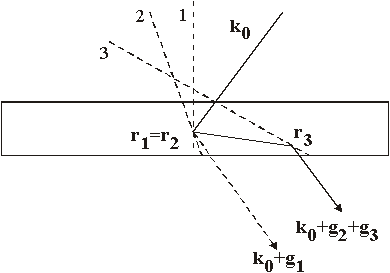
Fig. 1. Schematic sketch of a two-step multiple reflection simulating a forbidden reflection. |
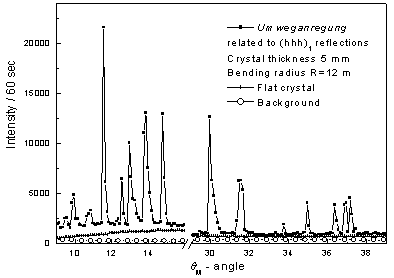
Fig. 2. A part of q
M -2qD scan
with the Si crystal slab (the largest face parallel to (110)) and set for
(hhh)1 reflections in the symmetric transmission geometry. |
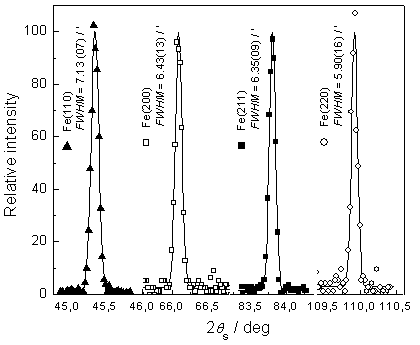
Excitation of multiple reflection effects in cylindrically bent perfect Si single-crystals which result in Umweganregung (Renninger effect) is in fact a simulation of forbidden basic primary reflection by a cooperative action of secondary and tertiary reflections. Schematically is this process shown on Fig. 1. Using a standard qM-2qD scan with the bent crystal in symmetric transmission geometry many strong umweg-effects could be determined as demonstrated in Fig. 2. For the present experimental studies we chose the effect observed at qM=29.956o which is related to the simulation of the forbidden 222 reflection by a co-operative action of 153/1-3-1 and -31-1/513 (secondary/tertiary) reflections at l=0.156 nm. It has been already proved in the experiment with a single crystal sample depending on the crystal curvature the monochromatic beam from the umweg monochromator is highly parallel within the divergence of about (1-5)x10-4 rad and has excellent Dl/l resolution [1]. In the present case the monochromatic beam obtained by this multiple reflection monochromator was used in powder diffraction test carried out with a solid a-Fe polycrystalline standard sample (F=2 mm). Fig. 3 displays several diffraction profiles that clearly prove the applicability of the umweg-monochromator for high-resolution diffraction studies. FWHM of the diffraction profiles are however, determined by the spatial resolution of the used PSD and the width of the sample [2, 3]. Therefore, it can be considered as an upper limit.
|
|
|
|
Fig. 3. Examples of the a-Fe
diffraction profiles taken with
the umweg-monochromator. |
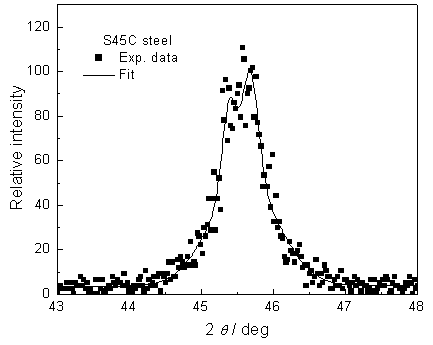
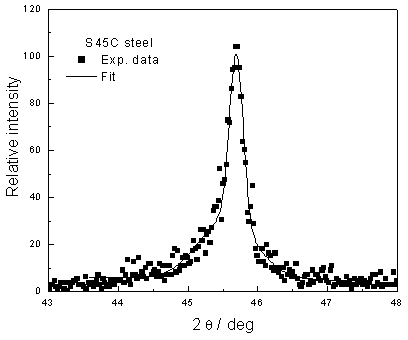
Fig. 4. Raw experimental data of a induction-hardened S45C steel taken 2 mm
under the surface. |
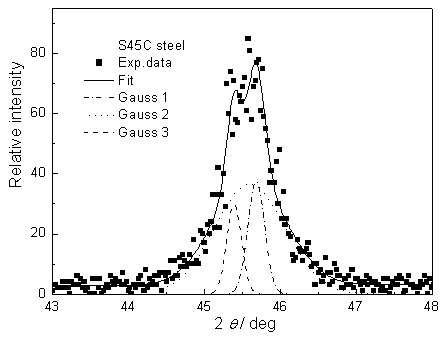
Then, such a high-resolution diffraction performance we used for investigation of Fe-reflections in an induction hardened S45C rod (F=20 mm) having different phase composition at different distances from the rod axis. For determination of gauge volume we used 2 mm input and output slits in the incident as well as diffracted beam, respectively. Fig. 4 displays the diffraction profile (black points) obtained at the distance 8 mm from the axis (2 mm below the surface). Similarly, Figs. 5 displays the diffraction profile (black points) obtained at the distance 6 mm from the axis (4 mm below the surface). Fitting of the experimental profiles were carried out by two (in the case of data related to Fig. 5) or three Gaussians (in the case of data related to Fig. 4) (corresponding probably to pearlitic, ferritic, and martensitic phases). The results after the fitting procedure are shown in Figs. 6 and 7. Thanks to the used high-resolution monochromatic beam, after a fitting procedure we could reliably determined contributions of the individual phases.
Diffractometers employing umweg-monochromator can provide ultra-high resolution at a rather low take-off angles. The resolution is comparable to that of back-scattering instruments. Of course, they can be efficiently used namely at high-flux neutron sources. It should be noted that in our case the resolution provided by the umweg-monochromator is higher than that presented in Fig. 3. The widths of the diffraction profile received at the standard a-Fe sample are in our case determined by the spatial resolution of the position sensitive detector (1.5 mm) and the widths of input and output slits (2 mm).
|
|
|
|
Fig. 5. Raw experimental data of a induction-hardened S45C steel taken 4 mm under the surface. |
Fig. 6. Induction-hardened S45C steel diffraction profile taken at 2 mm under the surface with the fitted profiles corresponding to the perlitic, ferritic and martensitic phases. |
Acknowledgement
This
study was partially supported by the
research projects MSM2672244501, GA-CR 202/03/0891, GA-CAS A1048003 and COST–OC P7.003.
[1] P. Mikula, B. Chalupa, J. Kulda, M.Vrána, R.T. Michalec and L. Sedláková, In Proc. of the Symp. Neutron Scattering, August 6-8, 1984, West Berlin, Report HMI-B 411, p. 233-235.
[2] P. Mikula, M. Vrána and V. Wagner, In Proc. of the ECNS 2003 Conference, September 3-6, 2003, Montpellier, France, Physica B, (2004), in print.
[3] P. Mikula, M.
Vrána, M. Furusaka, V. Wagner, Y. N. Choi, K. Moon, V.T. Em and
C. H. Lee, In Proc. of the Int. Conf. NOP 2004, January 13-16, 2004,
Tokyo, Japan, Nucl. Instrum. Methods, (2004), in print.
|
|
|
Fig. 7. Induction-hardened S45C steel diffraction profile taken at 4 mm under the surface with the fitted profiles corresponding to the ferritic and martensitic c phases. |
